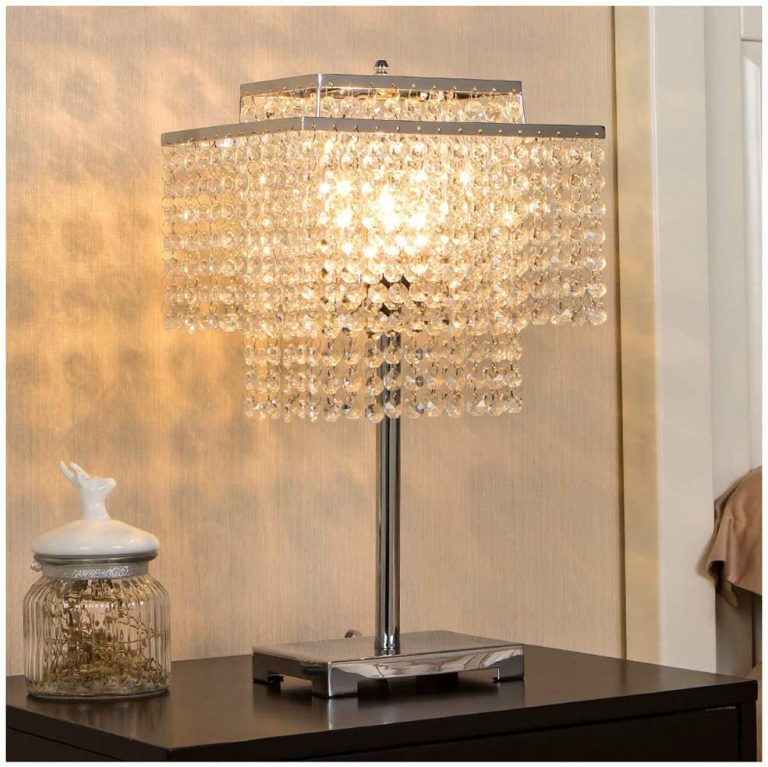
How to Install a Touch Control on a Seaside Village Crystal Table Lamp
You’re in luck if you need a touch control for your Seaside Village Crystal table lamp.
Having a touch control allows you to adjust the brightness of your lamp and even replace it.
You’ll need to know some things before installing the touch control.

- Dimensions: 4.3 inch/110mm diameter, 11.22 inch/285mm high with a 59 Inch/1500mm plug-in power cord
- Table lamp touch sensor with 4 settings (Low, Medium, High, Off). UL-listed touch power source makes the bedside table lamp safer and more durable
- 110 pieces of k9 crystal are wired in to avoid falling out. The touch cylinder lamp is built with a sturdy metal frame, standard base and E26 socket
- Contemporary and modern crystal table lamp adds a large touch of elegance to your home. Used as a touch lamp, bedside nightstand lamp or buffet lamp to remodel and decorate any room
- A Led Bulb Included. The modern lamp comes with a led bulb. No flick, no dazzle, no UV, no energy-wasting! If you want to change the inluded bulb, not over 60W incandescent bulbs are greatly recommended.Please note: it may cause to flicker or lose touch dimming function with other LED bulbs owing to the incompatibility.
Last update on 2026-03-30 / Affiliate links / Images from Amazon Product Advertising API
Here’s a detailed chart for installing a touch control on a Seaside Village Crystal Table Lamp:
| Step No. | Description | Detailed Instructions |
|---|---|---|
| 1 | Gather Tools and Materials | – Touch control module – Screwdriver – Wire stripper – Electrical tape – Wire nuts |
| 2 | Unplug the Lamp | Ensure the lamp is not connected to any power source to avoid electrical shock. |
| 3 | Disassemble the Lamp | – Remove the lampshade. – Unscrew the light bulb. – Carefully open the base of the lamp to access the wiring. |
| 4 | Identify and Label Wires | Identify the hot, neutral, and ground wires inside the lamp. Label them for clarity. |
| 5 | Cut the Hot Wire | Use wire strippers to cut the hot wire (usually black or red). Strip about 1/2 inch of insulation from both ends. |
| 6 | Connect Touch Control Module | – Connect the red wire from the touch control module to one end of the cut hot wire using a wire nut. – Connect the black wire from the module to the other end of the cut hot wire. – Connect the white wire from the module to the neutral wire (usually white) in the lamp. – Connect the green wire from the module to the ground wire (usually green or bare). Secure all connections with wire nuts and wrap with electrical tape. |
| 7 | Secure the Touch Control Module Inside the Lamp | Place the module inside the lamp base, ensuring it is secure and does not touch any metal parts. |
| 8 | Reassemble the Lamp | – Close the lamp base securely. – Reinstall the light bulb. – Put back the lampshade. |
| 9 | Test the Lamp | Plug in the lamp and test its functionality by touching different parts of the lamp base to ensure it operates correctly. |
| 10 | Troubleshoot (if necessary) | If the lamp does not work, double-check all connections for proper installation and secure attachment. |
Feel free to contact us if you need more details on any specific step.
Replace the touch control.
A touch lamp is a convenient way to change the level of light in a room. It uses magic to change the brightness of the bulb without having to find a small switch.
This is done by regulating the amount of electricity provided to the bulb.
Touch lamps are also easy to install.
To test the lamp, unplug it from the outlet. If the touch lamp does not come on, there may be a problem with the outlet or the circuit breaker.
However, if the lamp does turn on, it may be damaged.
If the lamp is still not working, it may be time to replace the touch control. To do this, you must first remove the old touch control. You can then replace it with a new one.
There are three basic types of touch lamps: the B11 6W LED candle bulb, the LED touch lamp, and the touch cylinder lamp.
Each provides a different lighting effect.
The B11 bulb has a lower heat output and no flicker. It produces a warm glow that is not dazzling.
The LED lamp has an adjustable shade and three different brightness levels. Touching the lamp’s base increases its brightness, while another touch reduces it.
The touch cylinder lamp has a solid metal base, which ensures that it does not bend or tip over. Another great feature is its RGB color display.
The glass shade is a nice touch that adds a touch of glamour to your home. The multicolor night light lamp is an interesting way to add more variety to your atmosphere.
Adjust the brightness
If you are looking for a touch-control lamp that can adjust the brightness of your Seaside Village Crystal Table Lamp, you have come to the right place.
This lamp has a sturdy metal base and is ideal for your bedroom or living room. It also features a 3-way dimmable touch control that allows you to adjust the brightness of your lamp.
The touch cylinder lamp features a solid metal frame and a 6W amber LED bulb that provides a gentle glow. It is also equipped with an E26 socket for easy installation.
Aside from its beautiful design and excellent light performance, the B11 6W LED candle bulb gives off a soft, warm glow without any buzzing. You can use this lamp for guided meditation or yoga.
The three-way dimmable touch control allows you to change the light levels of your Seaside Village Crystal Table Lamp. Multiple color options are also available.
Whether you want to add a decorative accent or need an efficient source of lighting, the 3-way dimmable touch control is a great solution. It is also extremely easy to operate.
All you have to do is plug it into an electrical outlet and tap the touch control to change the brightness.
For best results, unplug the lamp before installing the new touch control. Also, use a locknut to hold the yellow touch control wire to the lamp base.
When you are done installing the new touch control, make sure that the light bulb has been installed properly.
Otherwise, the lamp might not work. Likewise, if the filament has been damaged, you must replace it.
Disassemble the lamp
The seaside village crystal table lamp is a funky little beast worth the splurge. Its light bulb and touch control have seen better days, but it is an elegant-looking piece of functional and funky art.
Fortunately, it is fairly easy to disassemble and reassemble, which may be the most enjoyable task.
The best way to start is to find the power cord, unscrew the cover, and unplug the lamp.
While you’re at it, consider rewiring the base plate with a new power cord.
This should also be a good time to check the touch controls and replace the Slack afflictions. Once that’s done, you’re set to go. Hopefully, you won’t have to tinker with the touch controls too often.
When you’re finished, you’ll have a beautiful work of art to display proudly for years to come.
You’ll also be proud to have the best of the best around for your company.
Thankfully, the Seaside Village crystal table lamp is a fairly easy fix.

- LED Compatible Dimmer – Inline light dimmer switch works with up to 75 watt dimmable LED / CFL bulbs or 200 watt Incandescent; 120Vac Input Voltage; 8 ft extension cord allows you place the touch pad in a convenient location; the anti-slip pad on the bottom prevents it from sliding during the dimming process
- Touchpad Dimmer Control – Tap anywhere on the touch pad simply to dim your lights with 3 dimming levels; 1st touch to get 30% brightness; 2nd touch to get 60% brightness for normal room light; 3rd touch to get 100% brightness for reading ; 4th touch to turn the power off completely; side outlet is perfect for tight spaces and behind furniture
- Create the Perfect Ambiance – Adjust bedside lamps, table lamps, night lights, decorative lighting to desired level of your preferred brightness; easy to control mood lighting for bedroom, nursery room, holidays, and so on; create convenience for hard-to-reach lights; perfect gift for your families and friends
- Energy Efficiency – Dim the lights to save energy and extend bulb life for your expensive lamps; let your eyes gradually adapt to bright light or darkness; reduce eyestrain and protect your eyes from overly bright lights; save money and make your home more comfortable
- No Wiring Necessary – Quick to install with tool-free set-up; no need to install an in-wall dimming device; just plug your 2-pronged lamp into the dimmer, and plug the dimmer into a polarized receptacle, then realize your lamp touch control; RoHS compliant material (safety, health and environmental protection); ETL certified
Last update on 2026-03-30 / Affiliate links / Images from Amazon Product Advertising API
Reconnect the two neutral lamp wires to the new touch control white wire
You should follow the following steps when reconnecting the two neutral lamp wires to the new touch control white wire.
First, remove the old switch from the electrical box. Do not cut any wires when removing the old switch.
Next, unplug the touch lamp from the outlet and check whether the cord is damaged. If it is, you may need to replace the touch control. Once you have removed the old touch control, plug in the new one.
Before replacing the switch, you should also check if the Neutral wire is attached to the Neutral bus bar in the main service panel.
It must never be connected to the ground conductor outside the breaker box.
The Neutral wire is the current carrier. It is usually white, the same color as the white wire on the light fixture and junction box.
Electricity returns to the energy source once the neutral wire is correctly connected to the neutral bus bar. However, it is important to note that it may or may not be connected to switches.
If the neutral wire is not attached to the neutral bus bar, you may need to call an electrician. They will check whether the Neutral wire has been stripped or connected to the Neutral bus bar in the main breaker box.
As a part of your preparation, you should remove the electrical tape from the wires. If you do not clean the tape off the wires, you may short-circuit them.
Once you have completed all these steps, you should connect the two neutral lamp wires to the touch control white wire. This will allow electricity to flow from the mains to the lamp.
Check the lamp’s operation after plugging it back in.
The first thing that comes to mind is the battery, but a quick plug into the wall is all you need.
It’s also a good time to inspect the cord, the aforementioned bulb, and everything else, including the lamp itself.
If the oh-so-elegant bulb has gone bad, you can order a replacement from a nearby lighting retailer for under a tenner or less if you have a knack for tinkering with electronics.
For the uninitiated, replacing a bulb in a table lamp is akin to putting the proverbial hen into a microwave.
Considering that a table lamp has a very basic electrical circuit, the battery and bulb should last a good couple of months, depending on usage.
However, if the battery is dead, you’ll need to order a replacement from the manufacturer or replace the lamp entirely.
If you have the patience and a few spare minutes, you can also fully disassemble the lamp.
To prevent further mishaps, take note of any electrical modifications or replacements made.
Keeping an inventory of parts and accessories and storing the replacements in a central location is a good idea. Having a few spare parts handy will prevent a snafu.